Citrix XenDesktop 7.1

By Thomas Poppelgaard

Citrix XenDesktop 7.1 is now finally released and vGPU is now in the product and build in with MCS, very very cool. Microsoft have just released Windows 8.1 and Server 2012R2 and in this release of Citrix XenDesktop 7.1, Citrix are supporting Microsoft newest Operating System Platforms.

One of the things that have been fixed in the XenDesktop 7.1 Virtual Delivery Agent is following:

  • With HDX 3D Pro enabled, the NVIDIA card might not support certain resolutions. This enhancement introduces support of up to 2560×1600 pixel resolutions.
  • With HDX 3D Pro enabled, client connections to a XenDesktop 5.6 VDA do not support resolutions beyond 1900×1200 pixels. This enhancement introduces support for a wide range of additional resolution ratios, including:
    • 1920×1200
    • 2048×1152
    • 2560×1440
    • 2560×1600

What’s new in XenDesktop 7.1

  • GPU — The Graphical Processing Unit (GPU) capabilities feature provides graphics virtualization, offering a superior experience for users who use graphic-intensive applications and often manipulate 3-D models. The GPU feature also can improve the graphics experience for a large number of users. Administrators can evaluate workflows for the creation of GPU-capable connections and machine catalogs created with an MCS-provisioned master image. If problems are encountered, then Administrators may need to manually create the machines.
  • Windows Server 2012 R2 and Windows 8.1 support — Deliver a high-definition user experience on Windows 8.1 virtual desktops and physical machines. HDX 3D Pro has also been upgraded to support Windows 8.1.

vda-platform-support


Upgrade XenDesktop 7 components to 7.1

When you run the installer AutoSelect, the wizard checks whether certain Site components (such as the Delivery Controllers, Director, and VDAs), need to be upgraded. If you opt not to upgrade some components during this process, when you run Studio, it performs a component check and notifies you when components need to be upgraded. You cannot proceed to manage your Site until you upgrade these components.

Upgrade Site with components deployed on different machines

The following figure shows the high-level processes involved when upgrading a XenDesktop 7 to XenDesktop 7.1 in which Studio components are deployed on different machines.

Perform the upgrade procedures in the following order.

Check the licenses

Make sure that your Subscription Advantage date for licenses is no earlier than 2013.0522.

Upgrade StoreFront

If StoreFront is deployed on a separate machine, follow the steps described in Upgrade core components from eDocs

Upgrade Director

If Director is deployed on a separate machine, follow the steps described in Upgrade core components from eDocs

Upgrade Provisioning Services

If you are using Provisioning Services, follow the procedures described in Upgrading Provisioning Services from eDocs

Upgrade the Virtual Delivery Agent

For Remote PC Access deployments, Citrix recommends that you upgrade a VDA in a remote PC using a command-line method. For detailed information, see Install using the command line.

  1. Log on to the server using a local administrator account and run the installer by inserting the media or mounting the ISO drive for this release, and double-clickingAutoSelect.
  2. On the Welcome page, click Start. The wizard detects what components need to be upgraded and displays the Upgrade options page, activating the components you can upgrade.
  3. On the Upgrade options page, select:
    • Virtual Delivery Agent for Windows Desktop OS for Desktop OS, and earlier XenDesktop versions
    • Virtual Delivery Agent for Windows Server OS for Server OS
  4. On the Firewall page review the default ports and configure firewall rules.
  5. On the Summary review the prerequisites to be installed and the components to be upgraded then click Upgrade.
  6. On the Finish Upgrade page one of the following messages appears upon completion:
    • Success — Upgrade successful appears when the upgrade completes without errors.
    • Failed — The Upgrade failed appears with a list of failed components. Click Why did this fail to review what you must do to fix the problem. Other components that installed successfully are retained; you do not need to reinstall them.
  7. Click Finish to complete the upgrade.

Upgrade Delivery Controllers

Citrix recommends that you upgrade Delivery Controllers as follows:
  1. Upgrade half of your Site’s Delivery Controllers.
  2. Use the upgraded version of Studio to perform the Site upgrade as described in Upgrade core components.
  3. Upgrade your remaining Delivery Controllers.

Upgrade Databases using Studio

Use Studio to upgrade the Database.

Automatically upgrade Databases

  1. Start Studio. The wizard detects what components need to be upgraded and displays the Mandatory upgrade page.
  2. Select Start the Site upgrade automatically.
  3. At the prompt, select I am ready to upgrade.The wizard displays the upgrade progress. After the upgrade completes, the wizard performs tests. This takes several minutes.
  4. At the Site Upgrade Complete window, you can optionally view a data migration report and then click Finish.
  5. At the Upgrade successful page, click Finish upgrade and return to the Site overview.

Manually upgrade Databases

To minimize Site down time when performing a manual upgrade, it is important that the XenDesktop Administrator closely coordinates with the Database Administrator. This process requires that you run a script that temporarily disables Xendesktop Services while the manual upgrade scripts are run by the Database Administrator using a preferred tool (for example, SQL Server Management Studio). Ideally, immediately after these scripts complete, the XenDesktop Administrator should enable XenDesktop Services and complete the upgrade using Studio.

Manual upgrade requires:

  • Backing up the databases
  • Running the generated scripts in the following order:
  1. DisableServices.ps1 — PowerShell script to be run by the XenDesktop administrator on an XenDesktop Controller.
  2. UpgradeSiteDatabase.sql — SQL script run where the Site databases resides
  3. UpgradeMonitorDatabase.sql — SQL script run where the Monitor databases resides.
  4. UpgradeLoggingDatabase.sql — SQL script run where the Logging database resides.
    Note: You should only run this script if the Logging database changes. For example, run it after applying a hotfix.
  5. EnableServices.ps1 — PowerShell script to be run by the XenDesktop administrator on an XenDesktop Controller.

To upgrade manually

  1. Start Studio. The wizard detects what components need to be upgraded and displays the Mandatory upgrade page.
  2. Select Manually upgrade this site.
  3. The wizard checks for License Server compatibility. Make sure your License Server and license files are compatible with XenDesktop 7.1. Select the confirmation check box and click Continue.
  4. The wizard prompts you to backup the Database. When you have done so, select the confirmation check box and click Continue.
    • The wizard generates the manual upgrade scripts that you must run and displays them in a window
    • The Mandatory Upgrade page changes to display a checklist of the manual upgrade steps
  5. Make sure you have completed the checklist tasks and click Finish upgrade and return to Common Tasks.

Upgrade core components

The installer automatically upgrades core components such as Delivery Controllers, Studio, and Director if they were previously installed.

  1. Log on to the server using a local administrator account and run the installer by inserting the media or mounting the ISO drive for this release, and double-clickingAutoSelect.
  2. On the Welcome page, click Start. The wizard detects what components need to be upgraded and displays the Upgrade options page, activating the components you can upgrade.
  3. Click Delivery Controller.
  4. Accept the license agreement.
  5. Review the upgrade steps, click I’m ready to continue and click Next.
  6. On the Core Components page review the components available for upgrade.
  7. On the Firewall page review the default ports and configure firewall rules.
  8. On the Upgrade page review the prerequisites to be installed and the components to be upgraded and then click Upgrade.
  9. On the Finish Upgrade page one of the following messages appears upon completion:
    • Success — Upgrade successful appears when the upgrade completes without errors.
    • Failed — The Upgrade failed appears with a list of failed components. Click Why did this fail to review what you must do to fix the problem. Other components that installed successfully are retained; you do not need to reinstall them.
  10. Click Finish to complete the upgrade.

Upgrade a Site with components deployed on the same machine

The following figure shows the high-level processes involved when upgrading a Site in which all components are deployed on the same machine.

Upgrade XD7 on a single machinePerform the upgrade procedures in the following order:

  1. Make sure that your Subscription Advantage date for licenses is no earlier than 2013.0522.
  2. Back up the Controller databases.
  3. Optionally back up templates and upgrade Hypervisor.
  4. Upgrade PVS servers and agents as described in Upgrade Provisioning Services from eDocs
  5. Upgrade the core components as described in Upgrade core components from eDocs
  6. Upgrade Virtual Desktop Agents as described in Upgrade the Virtual Delivery Agent from eDocs
  7. Upgrade the Database using Studio as described in Upgrade Databases using Studio from eDocs
  8. Upgrade the remaining Delivery Controllers.

Post upgrade processes

After the upgrade and data migration is complete, you can run environment and configuration tests to make sure that the Site is in functional order.

To test the upgraded site, select Test Site n the Site Configuration pane of the Studio Common Tasks page.

Source

If you want to upgrade your current Citrix XenDesktop 7 environment to XenDesktop 7.1. environment look here

fixes in XenDesktop 7.1 – Virtual Delivery Agent

fixes in XenDesktop 7.1 – Controller 

Download Citrix XenDesktop 7.1 here (Require MyCitrix ID)

By – http://www.poppelgaard.com/citrix-xendesktop-7-1

The Unsupported Features of Citrix XenDesktop 7

from Citrix edocs website

The following features are not currently in or are no longer supported by XenDesktop 7 and related releases.

Features not in XenDesktop 7

  • Secure ICA encryption below 128-bit — In previous releases, Secure ICA could encrypt client connections for basic, 40-bit, 56-bit, and 128-bit encryption. With this release, Secure ICA encryption is available only for 128-bit encryption.
  • Direct SSL connections — In previous releases, administrators could configure SSL Relay support connections to Web Interface and between an SSL-enabled plug-in and each server. These types of connections are not supported in this release.
  • Legacy printing — The following printing features are not supported in this release:
    • Backward compatibility for DOS clients and 16-bit printers, including legacy client printer name.
    • Support for printers connected to Windows 95 and Windows NT operating systems, including enhanced extended printer properties and Win32FavorRetainedSetting.
    • Ability to enable or disable auto-retained and auto-restored printers.
    • DefaultPrnFlag, a registry setting for servers that is used to enable or disable auto-retained and auto-restored printers, which store in user profiles on the server.
  • Secure Gateway — In previous releases, Secure Gateway was an option to provide secure connections between the server and user devices. NetScaler Gateway is the replacement option for securing external connections.
  • Shadowing users — In previous releases, administrators set policies to control user-to-user shadowing. In this release, shadowing end-users is accomplished in the Director component, which uses Microsoft Remote Assistance to allow administrators to monitor and troubleshoot issues on user machines.
  • Web Interface — StoreFront replaces Web Interface in XenDesktop 7 for aggregating apps to users.
  • Anonymous users — In previous releases, administrators publishing an application could give access to the group called Anonymous, which allowed guest users permission to access applications without user authentication. In this release, no guest permissions are supported. Using Studio, administrators configure Delivery Groups and then allocate virtual desktops and applications to Delivery Groups.
  • Session pre-launch — In previous releases, the session pre-launch feature could be used reduce application launch time during normal or high traffic periods. This feature is not available in this release.
  • Power and Capacity Management — In previous releases, the Power and Capacity Management feature could be used to help reduce power consumption and manage server capacity. The Microsoft Configuration Manager is the replacement tool for this function.
  • Flash v1 Redirection — Clients that do not support second generation Flash Redirection (including Receiver for Windows earlier than 3.0, Receiver for Linux earlier than 11.100, and Citrix Online Plug-in 12.1) will fall back to server-side rendering for legacy Flash Redirection features. VDAs included with this release support second generation Flash Redirection features.
  • Local Text Echo — This feature was used to accelerate the display of input text on user devices on high latency connections. It is not included in XenDesktop 7 due to improvements to the graphics subsystem and SuperCodec.
  • Virtual IP Loopback support — In previous releases, this policy setting could allow each session to have its own virtual loopback address for communication. This policy is not available in this release. For a possible work around on Windows Server 2012, see the Microsoft article: http://social.technet.microsoft.com/wiki/contents/articles/15230.rds-ip-virtualization-in-windows-server-2012.aspx.
  • Smart Auditor — In previous releases, Smart Auditor allowed you to record on-screen activity of a user’s session. This component is not available in this release.
  • Single Sign-on — This feature, which provides password security, is not supported for Windows 8 and Windows Server 2012 environments. It is still supported for Windows 2008 R2 and Windows 7 environments, but is not included with this release. You can locate it on the Citrix download website: http://citrix.com/downloads.
  • Oracle database support — This release requires SQL database.
  • Health Monitoring and Recovery (HMR) — In previous releases, HRM could run tests on the servers in a server farm to monitor their state and discover any health risks. In this release, Director offers a centralized view of system health by presenting monitoring and alerting for the entire infrastructure from within the Director console.
  • Custom ICA files — Custom ICA files were used to enable direct connection from user devices (with the ICA file) to a specific machine. In this release, this feature is disabled by default, but can be enabled for normal usage using a local group or can be used in high-availability mode if the Controller becomes unavailable.
  • Management Pack for System Center Operations Manager (SCOM) 2007 — The management pack, which monitored the activity of farms using SCOM, does not support this release.
  • CNAME function — The CNAME function was previously enabled by default. Deployments depending on CNAME records for FQDN rerouting and the use of NETBIOS names might fail. In this release, Delivery Controller auto-update is the replacement feature that dynamically updates the list of Delivery Controllers and automatically notifies VDAs when Controllers are added to and removed from the site. The Delivery Controller auto-update feature is enabled by default in Citrix policies, but can be disabled by creating a policy.

    Alternatively, you can re-enable the CNAME function in the registry to continue with your existing deployment and allow FQDN rerouting and the use of NETBIOS names. For more information, see CTX137960.

  • Quick Deploy wizard — In previous releases of Studio, this option allowed a fast deployment of a fully installed XenDesktop deployment. In this release, the option is not available.
  • Native device drivers on Delivery Controllers — To allow upgrades without restarting, no drivers are installed.
  • Remote PC Service configuration file and PowerShell script for automatic administration — Remote PC is now integrated into Studio and the Delivery Controller.
  • Workflow Studio — In previous releases, Workflow Studio was the graphical interface for workflow composition for XenDesktop. The feature is not supported with this release.

Features not in Citrix Licensing 11.11.1

  • Citrix Licensing Configuration Service — This service displayed license information and enabled limited license server management in versions of Desktop Studio older than this new release of Studio . The old service is replaced in this release by Citrix Web Services for Licensing, which provides similar functionality. The enhanced tool also provides additional functionality. Citrix recommends upgrading to XenDesktop 7 or using the License Administration Console to manage licenses.

Features not in Receiver

  • COM Port Mapping — COM Port Mapping allowed or prevented access to COM ports on the user device. COM Port Mapping was previously enabled by default. In this release, COM Port Mapping is disabled by default.
  • LPT Port Mapping — LPT Port Mapping controls the access of legacy applications to LPT ports. LPT Port Mapping was previously enabled by default. In this release, LPT Port Mapping is disabled by default.
  • PCM Audio Codec — Only HTML5 clients support the PCM Audio Codec in this release.
  • Support for Microsoft ActiveSync.
  • Proxy Support for Older Versions — This includes:
    • Microsoft Internet Security and Acceleration (ISA) 2006 (Windows Server 2003).
    • Oracle iPlanet Proxy Server 4.0.14 (Windows Server 2003).
    • Squid Proxy Server 3.1.14 (Ubuntu Linux Server 11.10).

By – http://support.citrix.com/proddocs/topic/xendesktop-7/cds-overview-features-not-in-this-release.html

UEM Smackdown 2.0: Head-to-head analysis of Appsense, Citrix, Immidio, Microsoft, Liquidware Labs, PolicyPak, RES, Scense and others

by Ruben Spruijt 

It’s a pleasure to announce the availability of the UEM Smackdown 2.0 whitepaper and book. Together with other PQR colleagues and community friends such as Aaron Parker and Jeremy Moskowitz we have spent quite a lot of time updating the previous and well received UEM Smackdown.

UEM Smackdown..?

Do you want to know the different User Environment Management solutions? Do you want to know the role of UEM in Application and Desktop Delivery solutions such as VDI? Are you looking for insights into User Environment Management? Are you looking for an independent overview of the User Environment Management (UEM) solutions and curious about the different features and functions each UEM vendor is offering? If so, this is the whitepaper you MUST read!

In the current market, there is an increasing demand for unbiased information about User Environment Management solutions. This white paper focuses on solutions that are anticipated to have an important role in User Environment Management. An overview of features has been created to enable a better understanding and comparison of capabilities.

The overall goal of this whitepaper is to share information about:

  • What is User Environment Management?
  • Explain the pros and cons of User Environment Management.
  • Describe the strategic questions and functionality of UEM solutions.
  • User Environment Management functionality and solutions overview.
  • Describe the different UEM vendors and their solutions.
  • Compare the functionality and features of various UEM solutions.

Traditionally the Windows endpoint is maintained with Client Management or PC lifecycle management solutions such as Symantec/Altiris Deployment Solution, IBM BigFix, Microsoft System Center Configuration Manager, Novell ZenWorks and others. The key functionality of these kinds of products include: OS deployment, application deployment, asset management, inventory, integration with CMDB and remote control. The primary focus of the Client Management solutions is the client device and not primarily the end-user’s workspace, so handling the User Environment, or User Workspace, isn’t in scope of the traditional approach of most of the Client Management Solutions.

Large software vendors are so focused on the management and maintenance of IT systems that they tend to forget the other important half–the user management. Users need to have a simple, uniform, fast and reliable workspace environment. Administrators would like to be able to manage this (Windows) workspace centrally, regardless of whether it is a physical or virtual workplace, implemented locally or centrally and whether the (Windows) applications are installed, streamed or virtualized. In many organizations the term ‘User Environment Management’ is still relatively unknown.

Our Definition of User Environment Management:

“User Environment Management (UEM) is a software solution that facilitates the management of the user environment and creates a dynamic, cost effective and, for the business-consumer, a transparent working environment. The focus is primarily on the end-user and his environment and not on the end user’s device”

Our experience is when the organization understands the meaning of user workspace management and sees the opportunities and benefits this provides to the users and the IT organization, the customer is often surprised that this solution has not been applied earlier.

Why UEM?!

In conversations with customers and during workshop sessions we regularly receive the question: “What are the primary reasons for implementing User Environment Management Solutions?” The answers are as varied as they are many:

  • Improve user experience and consistency across different platforms, VDI, SBC and local Laptops and Desktops.
  • Create a transparent User Environment independent of the various delivery solutions and empower a smooth Desktop Transformation.
  • Improves end-user mobility, access personalized applications and settings from any machine, any Windows Operating System- Roaming users.
  • It stabilizes Windows user profiles.
  • Gain control over user profiles and truly manage them.
  • Accelerated and consistent logon times.
  • Makes migration from old to new Operating Systems and Application Delivery solutions easier. Even rollback scenario’s from a new Operating System back to an old sys-tem is possible.
  • Replace custom (legacy) scripts.
  • Central and uniform management of the User Environment is key and will result in happy administrators and users and lower Total Cost of Ownership (TCO). Delegation of control is essential in such a management solution.
  • Provide better and granular support of user and application preferences. Never delete or restore entire user profiles.
  • It controls, facilitates and enforces user access to applications, file-types, (removable) devices, network and data resources.
  • User centric computing gains context awareness. Based on user location, device and custom settings,access to applications, data, network resources, devices and preferences is dynamically facilitated and from a security perspective enforced.
  • It facilitates Resource Management to control and optimize usage of CPU, Memory resources with focus on applications and (Virtual) Desktops.
  • The end-user is able to install applications on his (virtual) desktop even without Administrator Rights. User Installed applications with Dynamic Privileges, ideal for BYOD (Bring Your Own Device) and scenarios where dynamic application delivery in a static, – controlled desktop environment is needed.
  • It gives administrators and managers insights and reporting capabilities in Windows, Web applications, (virtual) desktop and license usage. It enforces license compliancy to various licensing models. Application licensing can be measured, tracked, enforced, or controlled, where needed.
  • Delivers detailed information on changes inside the User Environment Management environment that are needed as requirement for compliancy and certification standards such as Personal Information Acts (HIPAA), ISO 27001, SOX and NEN 7510.
    User Environment Management is an essential part in ‘layering the cake’ strategy, which means to separate (Physical) Hardware, Operating System, Applications and User Personalization. 

UEM Functionality

In a User Environment Management solution user personalization, applications and data need to be portable and context aware. The focus of UEM Solutions is the dynamic composition of the Users’ Environment. The environment, or workspace, is dynamically composed where the solution handles:


  • User Personalization: Application and Desktop Management; Application settings and configuration preferences, User Personalization such as printer settings.
  • User Profile Management: Manage Windows User profiles; local, roaming, hybrid, mandatory.
  • Application and Access Control: Security Management; enforce access to applications, persona and context aware.
  • Resource Management: Application performance optimization and management.
  • License Management: Insights, reporting and enforcing the use of licenses.
  • Application Delivery: User centric Application Installation with Dynamic Privileges, User Installed Applications.
  • Monitoring, Auditing and Reporting facilities on various levels with focus on the user environment.
  • User support: Facilitating user support.


UEM Strategy

With more than 40 different questions, the whitepaper can be helpful to determine and fill-in your strategy around User Environment Management and its role within Application and Desktop Delivery.

Vendor Matrix, who has focus on what

There are quite a few vendors in the “User Environment Management space”, which is why assembling a ‘Smackdown’ makes sense. The diagram below gives an overview of the focus of the various User Environment Management (UEM) software vendors. This diagram has nothing to do with the (possible) discussion about which vendor provides the most and/or best functionality or feature set.

Feature compare matrix

A complete overview of the all the ‘1001’ features and functionality is available in Chapter 6 – Feature Overview in the whitepaper. On a weekly basis I receive questions such as “Which solution is the best?” One of my favorite responses is: “First, don’t count the checkmarks of the different vendors; and second, when you have no idea about the requirements (both from a Business Consumer and IT-Pro perspective) flipping the coin is a fair approach in determining which solution you should choose. It saves you a lot of money on expensive consultants”. A better approach is understand the question “What do you want to achieve,” and read the chapter ‘UEM Strategy’.

Suggestions and improvements

We’ve done our best to be truthful, clear, complete and accurate in investigating and writing down the different solutions. Our goal is to write an unbiased objective document where possible, which is valuable for you!. If you have any comments, corrections or suggestions for improvements of this document, we want to hear from you. We appreciate your feedback. Please send e-mail Ruben Spruijt (rsp@pqr.nl) or twitter @rspruijt

Whitepaper and Book

The whitepaper is available for download and if you’re interested in a hard copy of the UEM Smackdown, you can order it here. “If I read a book that cost me $40 and I get one good idea, I’ve gotten one of the greatest bargains of all time.” #NiceQuote

Enjoy!

http://www.brianmadden.com/blogs/rubenspruijt/archive/2013/10/17/UEM-Smackdown-2-0-Head-to-head-analysis-of-Appsense-Citrix-Immidio-Microsoft-Liquidware-Labs-PolicyPak-RES-Scense-and-others.aspx

The guts of the XenDesktop 7 Blueprint… Hardware Layer

By Daniel –  Citrix Lead Architect

Sometimes, the things we learn early in life teach us the basic fundamentals we need in the future. Many of us probably had toys like this growing up or have them for our own kids.
Of course there are some out there who will say that they can get the square peg into the round hole if the beat the hell out of it. This is true, but you waste a lot of energy as well as probably damaging the peg and hole.

This simple concept of properly matching objects together fits with the final layer of the XenDesktop 7 blueprint.

So far, the blueprint has been mostly conceptual. The hardware layer takes the conceptual and turns it into physical. The hardware layer has us think about the storage fabric, server footprint and VM allocations.

But just like the block toy, we have the same situation occurring within the hardware layer. We need to properly match hardware technologies together.

Think about storage fabric and server footprint for a moment.

With storage fabric, I can choose either local, direct attached or centralized storage, while server footprint lets me opt for either rack mounted servers or blade servers. These two decisions, although separate, are tightly coupled, just like our block toy.

The type of storage fabric you select will have a dramatic impact on the server footprint, and the server footprint you select will also have an impact of the storage fabric.

Let’s say you want to go with blade servers for some reason. Although at first glance it would seem like I can go with either local or centralized storage, this is not truly the case. Due to the physical space limitations with blade servers, I will most likely only be able to support two disk spindles per blade. So although I could use local storage for desktop virtualization when using blade servers, I’m trying to force a square peg into a round hole.

What if we go with rack mounted servers (round peg) and centralized storage (square hole)?

Guess what? You can fit a round peg into a square hole, but you have unused space. It doesn’t fit perfectly. And that is exactly what we have with rack mounted servers with centralized storage. You can do it. It does work. But it typically isn’t the optimal solution, whereas local storage with rack mounted servers seems like a much better fit.

Depending on what you choose might impact the hardware you are capable of running. For example, if you chose local storage, you will have problems trying to run your environment with blade servers. Why? Because you only get 2 disk spindles. Not enough to handle the storage requirements for a virtual desktop solution (unless you add on storage optimization technologies.)

These two decisions help us add details to our architecture:

Of course the next part of the hardware layer is to start calculating how many physical servers you need and how much storage is required, which is a discussion for another time. But for now, we have the framework for our complete solution.
Daniel – Lead Architect

http://blogs.citrix.com/2013/10/14/the-guts-of-the-xendesktop-7-blueprint-hardware-layer/

Delegated Administratio in Xendesktop 7

By Bas van Kaam at – http://basvankaam.com/2013/10/14/delegated-administration-im-just-saying/

If you are used to working with XenApp, then being able to create custom administrator roles is nothing new, it’s just there like it’s supposed to be. However, if you are a hardcore XenDesktop admin then this is probably something you’ve been waiting for. The predefined administrator roles (5 in total) in XenDesktop 5 just don’t cut it, and we want, or need, flexibility. Well… with the release of XenDesktop 7 it’s now all there. You’ll still find a set of predefined roles but with the added possibility of creating a custom role, finally!


Pre-defined and custom

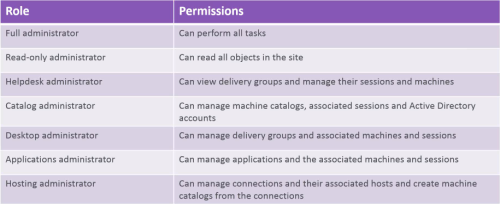
The ability to assign a user or certain groups of users, not only explicit permissions, but permissions to specific objects as well is a must in most organizations. With delegated administration in XenDesktop 7 you can do just that. The idea behind it is based on roles, scopes and objects which I’ll explain shortly. As mentioned, just like with XenDesktop 5.x there is also a set of predefined roles, you’ll find them in the overview below, note that these are not customizable. However, the real flexibility and granularity comes with the custom administration role, which is new.

Delegated Administration overview XD7

Roles

Looking at the above kind of gives you an idea what roles are about. Roles define what a user can do within your Site depending on the permissions granted. If we look at the Helpdesk Administrator role for example, it can view delivery groups and manage all sessions and associated machines with it. Unfortunately it doesn’t give us the option to configure which delivery groups the Helpdesk Administrator role can view and thus manage, meaning that this particular role can manage sessions and machines for all delivery groups within your Site. The same goes for the Applications Administrator role; it can manage all applications, including all associated machines and sessions, not much granularity here. But wait… this where the custom role come in.

Scopes and objects

Go hand in hand and help form the custom administrator role. With scopes you define which specific objects (per department for example) an administrator can manage as part of the custom role permissions, like; desktops, catalogs, applications, hosts etc…Basically the same as with the predefined roles mentioned above only now you can limit the scope to specific objects. By default there is one scope defined, it’s named ‘All’ and it holds all Site objects, including the ones that are created and added at a later time, it can’t be deleted or modified. All predefined roles mentioned earlier are based on this scope. So unless you create a custom role and the scope(s) to go with it, administrators will be able to manage all objects that fall within the range of one of the predefined roles you assign them.

It works like this

You first create a custom administrator role, give it a name and assign permissions to it. This is all still high level, for example, you assign the custom role permissions to manage several objects like; delivery groups and machine catalogs. During that same step you also decide what can be managed (sub-permissions) within these objects; can they create, add or delete applications to and from the delivery groups, add or delete machines to and from catalogs and so on and so forth, there is a whole list of options to choose from.

Next…

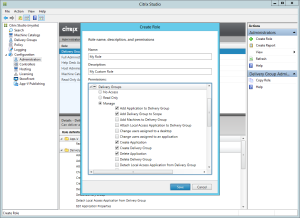
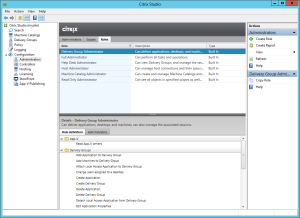
With high level I mean that these permissions still apply to all delivery groups and catalogs within your site (the ‘All’ scope). In the next step you configure the scope to which these permissions will apply. You simple select the delivery group(s) and catalog(s), again, called objects as part of the scope, to which these role permissions get applied and that’s basically it. Once created, you’ll have to assign the custom role plus scope(s) (and objects) to a user of choice by creating a new administrator. I’ll throw in some visuals to clarify. First we need to create our custom role. In Studio go to the Administrators page, it’s on the left. Click on ‘Create Role’ on the right hand side of the screen, a new window will pop up.

Delegated Admin 1

Give it a name, description and decide which permissions (and sub permissions) to assign.

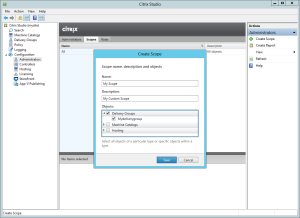
Delegated Admin 2

After clicking save, you’ll need to create your custom scope. Switch to the scopes tab and select ‘Create Scope’ on the right. Here you’ll see all objects available within your Site, select accordingly and click Save.

Delegated Admin 3

Once that’s done there’s just one more step left. You’ll now need to create a new administrator, as explained earlier, to which this custom role (and scope(s) plus object(s) can be assigned to. Give this some thought, especially if you have multiple custom Roles and Scopes. For example, assigning custom role permissions, during the first step,  to modify delivery groups doesn’t do anything when the accompanying scope is set to catalogs, so select accordingly. Select ‘Create Administrator’ on the right side of your screen.

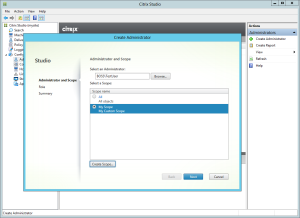
Delegated Admin 4

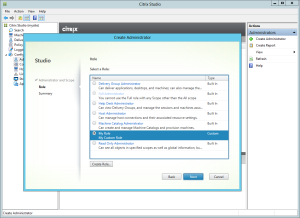
Click the ‘Browse’ tab to select a user account, next, select the appropriate scope to go with the custom role which you’ll need to select on the next page.

Delegated Admin 5

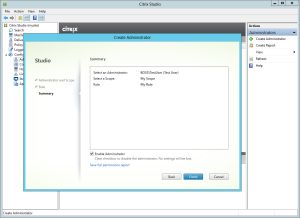
Finally the summary page will appear, meaning you’re done. Hit Finish and the rest will take care of itself. Make sure that the ‘Enable Administrator’ box is checked so that the account can be used right away, or not, if that’s what you need.

Delegated Admin 6

What else?

Every ‘normal’ domain user can become an administrator, there are no specific prerequisites. If a user is made a member of multiple custom administrator profiles then all permissions will be added up, they are inclusive. All custom administrator roles and scopes defined can be copied when necessary. If your Site is complex and has multiple custom administrators configured, dozens perhaps, you can use the so called Resultant Set of Permissions tool to see which permissions go with which custom admin account. Personally I’m not sure if this will be used much but I can see the added value in some cases.

Conclusion

Delegated Administration is something we can’t do without, I think we all agree. I wonder why Citrix waited this long to include it as far as XenDesktop is concerned. I can’t imagine this being extremely complicated to implement. Anyway, it’s here now and pretty straight forward to configure. I was playing around with it myself and thought it might be a good subject to write about. Although it taught me a thing or two, to be honest, you don’t need a manual to figure this one out. Thank you for reading anyway 😉

Bas van Kaam ©

Reference materials used: Citrix E-Docs website

Creating a Load Balanced Citrix StoreFront 2.0 Server Group with Citrix NetScaler 10.1

Citrix NetScaler

By Kees Baggerman at http://blog.myvirtualvision.com/2013/10/13/creating-load-balanced-storefront-2-0-server-group-citrix-netscaler-10-1/


A while ago Dane Young posted an excellent blogpost on the ITVCE site on how to create a load balanced multi-node Citrix StoreFront 2.0 server group with the Citrix NetScaler 10.1. You can find the blog post over here: http://blog.itvce.com/?p=4605

Coincidence or not I was working on a blog post on the same subject although I recorded the steps I took to create this setup where Dane used screendumps and a lot of text added to the screendumps and as I was cleaning up my laptop I found the recorded video’s and decided to upload them:

Installing StoreFront 2.0:

I downloaded the Citrix XenDesktop 7 files from the website, extracted them and installed them both of my web services (SF001 and SF002).

Configuring StoreFront 2.0:

After I logged on to the SF001 I did an initial configuration of StoreFront, as you can see I’m using HTTP here but HTTPS can be used too and is recommended by Citrix (but not used for this blogpost).

Join Server Group:


Server Groups were introduced with the launch of StoreFront, as much  has been said about StoreFront 1.x the new release of StoreFront brings stability and scalebility. I’ve added the actions on SF001 to allow a server to be joined to the existing group and the actions on the SF002 to be added to this existing group.

Create DNS Record:

As I changed the base URL for StoreFront to something I want to loadbalance I had to add the DNS Record.

Configure Citrix NetScaler:

This speaks for itself, this is how you can configure the Citrix NetScaler to load balance HTTP traffic over two web servers.

Proof:

Here you can see the traffic is being load balanced over the Citrix NetScaler configuration to the two web servers running StoreFront.

Missing features in XenDesktop 7 RDS

Posted by Michel Helderman at http://www.virtualdesktopblog.nl/2013/10/09/missing-features-in-xendesktop-7-rds/

With the release of XenDesktop 7 there is a lot of news about the exiting new features. With the merging of XenApp in XenDesktop 7 App Edition with Remote Desktop Services (Terminalserver) the benefits of XenDesktop VDI do also count for RDS, like easy deployment and a single architecture for management. But you have to realize that with the merging of XenApp in XenDesktop 7 there are some features that are missing in the new version. In this article I want to share my experience with missing features and possible alternatives.

First of all Citrix is already publishing a list of missing features, which can be found athttp://support.citrix.com/proddocs/topic/xendesktop-7/cds-overview-features-not-in-this-release.html. I will mention the most missed features of that list and possible workarounds.

Shadowing is no longer available like it was in XenApp. Shadowing was often used by helpdesks to support users and used the ICA protocol. The new way to do this is via Microsoft Remote Assistance. Remote Assistance is not working out of the box. You have to enable this via a Microsoft policy on your virtual desktops. Configure a policy in System / Remote Assistance / Offer Remote Assistance and assign a group to it. Next you can go to XenDesktop Director to find the session and Shadow it.

It is no longer possible to disconnect users from taskmanager on RDS servers. This is often used by administrators to reset frozen sessions. When you try this, you get an access denied error. The way to do this is to use XenDesktop Director. Find the session and Disconnect or Reset. You will notice that XenDesktop Director is becoming an important tool to manage your usersessions.

Session Pre-Launch is no longer available. Session Pre-Launch lets you create an empty session so when a user is actually starting a session he or she will simply connect to the already created session. This can enhance the user experience. There is no workaround for this, it simply doesn’t exist anymore.

Virtual IP addressing is not available. I have used this several times for applications that must be identified as unique connections to back-end systems. There is no workaround for this.

Health Monitoring and Recovery in XenApp made is possible to monitor if a server was healthy. For example you can monitor if certain services are running, and if not, then remote the server from loadbalancing. The alternative is using EdgeSight, but this is only included in the Platinum Edition.

Citrix Streaming is deprecated. Citrix recommends Microsoft App-V 5.0 for this. Although App-V 5.0 is a very good alternative, you will miss some things. Citrix Streaming was really simple in creating streams. It was also possible to stream to VDI desktops or end-user devices with the same concurrent user license. For App-V 5.0 you will need additional Microsoft MDOP licenses to stream to VDI and end-user devices. With the built-in RDS license you are only allowed to stream to the RDS desktop.

Citrix CPU Management is no longer available. I think CPU management is a must have on RDS because there will always be users that use CPU intensive operations. They will have a negative impact on the other users. The alternative is to use Fair Share CPU management of Windows Server. More on this can be found in an excellent blog post of Barry Schiffer.

StoreFront pass-through authentication is no longer working with webbrowsers. Pass-through is only working in the native Receiver. We often used pass-through authentication with Web Interface as a solution to use fat clients as a kiosk client. The user logs on in to local Windows and by replacing the shell with the Web Interface page the user can pass-through to the Citrix desktop. ThinKiosk is also a good alternative for this, and also uses the pass-through functionality of the webbrowser. The alternative is to use the native Receiver.

RES Workspace Manager is not supporting published applications in XenDesktop 7. It is not possible yet to publish directly from the RES console, like in XenApp, and process interception is not working in published applications that are published from XenDesktop Studio. The alternative is to use published desktops instead of applications. RES will support this in a future version.

Some features will be “fixed” in future releases of XenDesktop, but most of above features will probably not come back. You will have to use the Microsoft alternative. It is plausible that Citrix will stop developing features that are already included by Microsoft. Sometimes these are just as good as the Citrix features, sometimes you will have to accept that good things don’t come back.

Netscaler MasterClass – Oct 2013

Welcome to the Citrix NetScaler Master Class. At these live webinars you will learn about the most critical elements of cloud infrastructures and enterprise datacenter architectures. Get details on latest features of NetScaler, tips and tricks for easy configuration, and interact with our NetScaler product experts.

Agenda

  • NetScaler 101 – Content Switching
  • In the Spotlight – Global server load balancing – Assuring TOTAL availability
  • What’s new – NetScaler Product updates
  • News and Views – What’s going on in the ADC world
  • Master Class extra – Be heard and get the answers you’re looking for

The brains of the XenDesktop 7 blueprint… Control Layer

Control, control, you must learn control! – Yoda

The control layer is about creating a single, cohesive foundation for the solution that supports the user-layers (users, access and resources).

091113_1305_Doyouhaveyo1.png

You can NOT do the control layer if you haven’t defined your user layer, access layer and resource layer. The control layer of the XenDesktop 7 blueprint is subdivided into

  1. Access Controllers – responsible for providing the connectivity to the resources as defined by the Access Layer
  2. Desktop Controllers – manage and maintain the virtualized resources for the environment
  3. Infrastructure Controllers – standard infrastructure components

The point of the control layer is to define what and how many servers/devices you need to support the user layers. This is based on the size of the user groups as well as the overall design for those user groups.

The first part of the control layer focuses on the access controllers, which should not be confused with the access layer. The access layer defines the access policies, which are associated with each user group. The access controllers are the devices that allows you to implement those policies. If all of your users are local and you do not require a remote access policy, then there you will not require a NetScaler Gateway access controller.

The second part is on the desktop delivery controllers. The delivery controllers make sure you are assigned to the right resource. They make sure the resource is ready. And they make sure the resources are updated appropriately. With XenDesktop 7, this bucket of controllers was reduced in size. You will no longer see XenApp controllers (zone data collectors) because the “XenApp servers” in XenDesktop 7 utilize the same framework. This means XenDesktop users and XenApp users rely on the same desktop delivery controller!

And finally, the last part of the control layer deals with the other components, the supporting cast of characters which includes database servers, licensing server and hypervisor controller servers (vCenter, SCVMM, XenServer) Note: XenServer doesn’t really have a dedicated controller like vSphere and Hyper-V.

When we update the conceptual architecture to now include our control layer, you get the following:

As you see, almost everything begins with 2 instances so that we have some level of fault tolerance in that if one instance fails, we have a second instance to handle the load. Licensing only has 1 instance because there is a built in 30 day grace period, so who cares if it fails. You got 30 days to get licensing running again before users notice.
Daniel – Lead Architect

http://blogs.citrix.com/2013/10/10/the-brains-of-the-xendesktop-7-blueprint-control-layer/